Wednesday, November 13, 2013

Auction Project

I was asked to be my daughter's kindergarten room parent this year...a few parties, easy peasy!  Or so I thought.  It was only after I had agreed that I found out that I was in charge of the class auction project...what now?  We are new to the school, so I really didn't have a frame of reference for what they were looking for.  After talking to a few moms, I got a better idea of what was expected.  Each child in the class had to be a "part" of the project.  I decided I wanted to make a ceramic tile top table.  I wanted each child to color a tile and create the top.  I was intrigued by the constant Pinterest posts claiming you can color on ceramic with permanent marker and bake it in the over and...voila it's done.  Well, that didn't turn out to be the case with me..but after some trial and error, I found a way that was passable.  

Our budget for the project was 50.00 (that's what we would be reimbursed for).  My first mission was to find a table.  I needed a table with an inset or "lip" so that I could created the tile layer on top.  I bought a table and chair set from Ikea for 20.00 thinking it would be perfect.  But, as most things from Ikea...the quality wasn't exactly what I was hoping for.  The table top was flimsy and I was unsure if it would be substantial enough to hold the tile and the grout, etc.  On a whim, I stopped at our local Goodwill and found this beauty for 4.99.

Okay, so maybe not a beauty..yet!  But nothing a little cleaning and spray paint won't fix!  Plus, it had the lip/inset I was looking for to make the tile top...meant to be, I tell you!  

My next stop was Home Depot, where I purchased ceramic tiles for .13 each.  I needed 28 square tiles for the project, but I purchased extra for trials and screw ups, etc.  I also needed 3 longer tiles to finish the edge.  I was kind of amazed how it worked out perfectly!  Again...meant to be!  

Next, I needed to refinish the table.  Disclaimer, this was the first piece of furniture that I ever refinished and I am no means an expert.  There are tons of pins/tutorials that can guide you.  I sanded the table down, wiped it clean and spray painted it an antique white color.  It was a huge improvement!  

The kids would be adding a lot of colors and designs to the tiles, so I wanted to give the table a little uniformity.  So, I cut out a heart shape on my Cricut and traced a heart shape each tile.  Uniformity...and it gave the kindergartners a little guidance...always a good thing!  


Now came one of the more difficult parts.  Trying to decide what would be the best way to color and finish the tiles.  I scoured Pinterest looking for ways to color the tiles with permanent marker.  Some people gave the color/baking process rave reviews while others said it didn't work for them.  I decided to use regular Sharpies and try it several different ways.  I colored a few and then baked a few at different temperatures for different amounts of time.  Frankly, it just didn't work.  Some of the colors started "rolling off" and fading.  I am sure it was because the ceramic tiles are finished and shiny.  If it was a matte tile, this process may have worked great.  But, for my purposes I needed a different way.  Some people suggested oil based Sharpies.  I tried this and it actually worked fantastic.  But I was faced with a few problems:

1.  Oil Based Sharpies are extremely expensive.  Like 7.00 a marker.  Please refer to my 50.00 budget.   

2.  My daughter's school is a Catholic school and the kids wear uniforms.  I had no desire to be on the receiving end of angry parent phonecalls for ruining their kids expensive uniforms with oil based markers.  

So, I stuck with the regular sharpies..there are several challenges when coloring the tiles with these markers.  The colors will bleed together if not careful...but wiping off the marker and going over it fixes it.  Play around with it, you will see what I am talking about.  After the tiles were finished, I applied several coats of a clear lacquer.  Several.  Please, like I said I am not an expert....but make sure you take my advice on one thing.  Make sure the first coat is sprayed from at least a foot or so away.  If you spray too closely, you will destroy the color...it will run everywhere and your work will be for not.  A light first and second coat..then you can really put on a thicker coat later.  

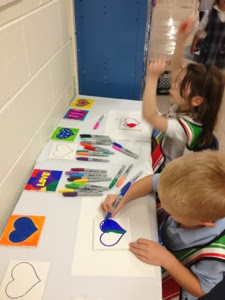
All set up at the school and ready for the kids to color
Coloring the tiles!

The next step was obviously setting and grouting the tiles.  I have absolutely no skills in this area...so I sat back and drank wine while I enlisted my brother in law to do that part.  I suggest you do the same..it's much easier that way.  I'm not sure what products he used..I just know he didn't do the "wipe the grout away with a wet sponge method)  He filled it right into the tracks with a gun and we used our fingers to smooth it out.  This worked well because I think that if we had been "wiping" the sand based grout across the tiles, some of the marker would have come off.  Although I was really good about lacquering the faces of the tiles, I wasn't as careful about the edges.  So, we had some touching up to do later.  
The finished product!  Auction worthy? I hope so!  
Another view
Closer view

The auction was this weekend..I actually don't know how much the table went for as I was unable to attend.  I will update the post when I find out!  Overall...this was a labor of love. It took a long time and it was a big process..but I think worth it in the end!  

Wednesday, July 31, 2013

The Minnie Mouse Extravaganza

The Minnie Mouse party was such a raging success, that it has taken me 3 months to even get the energy to blog about it...okay, I was also being lazy.  Okay, here it is!  All the fab details for my daughter's amazing Minnie Mouse extravaganza!!!  

A few yards of fabric, some 3M hooks and you have a fabulous and cheap backdrop.  I love using 3M strips and hooks for everything because there is no damage once the party is over.  I also love using  tissue paper pom poms in my decor...a lot of punch for pennies!  I order all of my tissue paper online from Nashvillewraps.com.  

The bunting was made with my Cricut.  No, I didn't pay $80 for the disney cartridge.  I used the basic shapes cartridge to cut out circles, lots and lots of circles and then I glued them all together.  As my 3 year old would say, "Easy Peasy Lemon Squeezie."  

The big minnie mouse was made from cardboard and tissue paper.  Remember making those crafts with little squares of tissue paper, the eraser end of a pencil and some glue.  Yeah, I did that.  After halfway through I was regretting it. 
Lucky for me, I have found a wonderfully talented cookie lady.  She is great and made these super basic minnie cookies for me.  I got this wooden tray from saveoncrafts.com and pained it white.  I added some pink krinkle paper from Nashvillewraps.com and it looked great!
 This cake was as good as it looks.  Thanks to Sugarbloom bakeshop in Downers Grove!  She is amazing and I use her for all of my cakes!  
 Some jars filled with color coordinated items can add some splash and fill up your dessert table
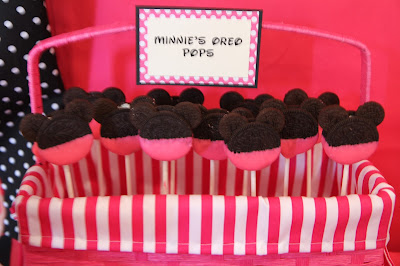
 These looked so easy on Pinterest.  Oreo Minnie Pops...super easy.  Not so much.  They were a huge pain in the ass and I would never recommend doing them, lol! Out of an entire package of oreos, this was all I could manage.  They were constantly breaking...but I was determined to get them on my dessert table.  
 Some fun containers from Nashvillewraps.com and some color coordinated candy from Party City.  Super cute!
 Jars on stands of varying heights add such a fun look to any dessert table!

 The finished product for the ears!  I wish I would have displayed them in a more fun way, but the day of the party, some things just have to give, lol!
 Adult Beverages.  We did a New Orleans food theme, so Hurricanes were definitely in order.  
 I finally had a party that required sunscreen and bug spray!  May birthdays are so unpredictable!
 Homemade bubbles from Pinterest.  This bubble station was a HUGE hit!  I used a recipe that called for glycerin instead of corn syrup.  I didn't like the idea of corn syrup because I figured it would attract bugs.  It worked great..except for one thing.  It KILLED the grass.  So, the week after the party, I had some resodding to do.  So, if you use the recipe with glycerin, use it on a hard surface :)
 I really wanted to make something special to welcome people to the party.  So, I made this homemade sign...and it was super easy.  I bought a circular piece of wood from Home Depot for around 3.00 and a piece of picket fence from Home Depot for about $1.00. Mr. Glue Gun was happy enough to attach the two together and I got to work.  I painted the entire sign pink and then printed and cut out the lettering (using a Disney font) and some white circles.  I modpodged them on the sign and it looked great.  I added two felt ears and it was done and done!  Cheap and personalized...two things this mom loves.   
 Kids food table.  I like to keep all of the kid friendly foods at a table within their reach.  
 Kids table
 Whenever I come up with a party theme...I am in charge of decor and Mr. Glue Gun is in charge of food.  Over the years, he has taken his part of the challenge more and more seriously.  He wants his food to be on par with the decor.  So, he always tries to come up with a food theme that ties into the theme or the characters.  This year, we did a New Orleans theme, complete with a crawfish boil.  
 Most times, there will be at least one dish that is the actual character...oh well, Donald was tasty!!  Shredded duck on individual pancakes with a cherry glaze.  

 Shrimp and Grits in individual cups...these were a huge hit!!!  People were begging for more!
 Desserts
 You can't have a Minnie/Mickey party without Hot Diggity Dogs!  

 The crawfish are done!  


Thursday, May 2, 2013

Mouse Ears

As you may know, Charlotte is having a Minnie Mouse party this year.  After years of being Nickelodeon snobs, they have recently switched to Disney...which gives me a whole new world of party planning possibilities!  Well, the "Mouseification" has begun at our house.

I wanted to make mouse ears for each of the children coming to the party.  So, I went to the Disney website and found the ones I liked...for $8.00 each.  I'm expecting 16 kids.  Over $100 for mouse ears? Plus what the divorce attorney would cost after my husband (going forward to be known as Mr. Glue Gun) found out what I spent on ears??  There had to be a better way.  I went to Etsy..they were still upwards of $4.00 each.  Better...but I knew I could still do it better and cheaper.

So, off to my Holy Land I went...aka Hobby Lobby.  For a little over $20.00 in supplies, I have 16 sets of mouse ears.  Fabulous!!  Are they as "nice" as the Disney ones.  Probably not totally.  But kids will be wearing them at the party and they will probably get destroyed, so they serve their purpose and I'm thrilled!!!  And the best part...Mr. Glue Gun can't divorce me over $20, right??


First, off...I needed to figure out what to use for the ears. I saw on Pinterest, someone used black felt and then had to "stuff it" with something to make them stand up.  What good are mouse ears if they won't stand up.  Stuffing them?  Mom with a glue gun doesn't have time for that nonsense.  So, I found this felt...and it was PERFECT! 


It's not soft and cozy, it's stiff and scratchy.  Trust me, you will see the difference and know what I'm talking about.  I grabbed about 5 sheets of it, they were .79 each.  Then, I used this little wooden circle as my template.  It's 3.25 inches in diameter and I picked it up from the JoAnn wood section for like .39.  I used a white paint pen to trace two circles for each ear, leaving a little space in-between each circle.  


When I cut them out, they looked like this.  You will want that little part in the middle to wrap around the headband.  I found the headbands at Hobby Lobby for around 1.00 each.  http://shop.hobbylobby.com/products/black-thin-satin-headbands-409458/
Wrap the ear around the headband and glue to together.  I tried felt glue and it was a huge failure.  Hot glue was the secret.  Why I even deviated from my trusty glue gun was beyond me!  I put a little glue under the headband to make sure the ear wouldn't slide up and down the headband.  Also, don't glue right on the edge because you don't want it leaking out...it's tacky.  And this mom doesn't want tacky ears!  
I was glueing with one hand and using my iPhone to take a pic, so I had one string of glue get too close to the edge...tacky city, lol!  Keep yours more towards the inside.
Press together!  And...voila!!!

For the boys, I did plain black on black ears.  For the girls, I bought hot pink headbands (also 1.00 each from Hobby Lobby) and added a fancy pink bow in the middle.  

I will post pics of the kids wearing them after the party.  So, take it from me, you party fashionistas...this is EASY!!!  Make your own ears and do not give Disney $100!!!  Seriously, I will come find you and smack you with my glue gun!  

Saturday, April 13, 2013

The Rainbow Party

For my daughter's 4th birthday...she wanted a rainbow theme.  If you know me, you know I love a good theme party!  And when I do a theme, I do a theme, lol!!!  Here are some highlights from the party!

This party was featured on Chickabug's blog!  See the link here:  

And, I'll just throw out there, I've been doing a family blog for like 5 years, but this is my first venture into a how-to type blog..so, I'm learning.  I'm posting past parties now...but for future parties, I may post projects as they are completed instead of all at once after the party.

The Attire
Purchased from Etsy Seller

The highlight of any of my parties...the dessert table

The Backdrop
Need a super easy and super cheap way to create a backdrop?  Use tissue paper and foam bard to create a colorful and easy to hang backdrop.  I used 4 separate pieces of foam board.  After the flowers were created, I simply duct taped them to the foam board in order.  You couldn't see the duct tape, so it was perfect.  Once it was assembled on the floor, I hung foam board on the wall using my favorite item of all time...3M hanging strips.  These are great for hanging temporary decor. They leave no marks on the wall!  

The Cake
My whole inspiration for wanting to do this party was to make this rainbow cake.  There is a reason this blog is called "Mom with a glue gun" and not "Mom with a spatula."  I'm not a good cook and I'm certainly not a good baker.  But, with Martha Stewart's white cake recipe and some food coloring, I figured I couldn't screw it up that bad..  

I doubled the recipe and separated it into 6 different bowls and dyed each bowl one of the colors of the rainbow.  I used Wilton gel coloring.  Don't use typical food coloring liquid that you buy from the grocery store. I baked the cakes a week before the party.  After they were completely cooled, I covered them in saran wrap...a lot of saran wrap and threw them in the freezer!
 On their cooling racks
The night before the party, I started stacking and icing!  The rosettes on the outside were beautiful but also extremely functional.  While I was icing the outside, the cake was getting kind of crumbly.  So, the nice white exterior icing was turning into a confetti nightmare.  The rosettes hid all of the crumbs beautifully!  
After we sang, "Happy Birthday, I was super nervous to cut into the cake!  But, it turned out pretty decent!  Not bad for a non baker!  

Cupcakes in a Jar
Let's face it, we're in a mason jar craze.  Everything has to be in a jar, cheesecake in a jar, cupcakes in a jar, etc.  So, alright...I'm on the bandwagon.  Let's make some cupcakes in a jar.  These were a pain in this mom's glue gun loving ass.  I made them three times...first the batter was too soupy, some were underdone.  Frankly, these were a disaster.  But,I was hell bent on having these on my dessert table.  I finally got them to a point where they were edible and I was done.  Would I make these again, no..  At least not rainbow.  Because each layer had to be piped in individually.  Lord, I thought my husband was going to kill me at one point.  

 The Cake Plate
I wanted to make something to really make our rainbow cake stand out!  So, I thought I would create a "tutu" around the cake stand to mimic the tutu my daughter would be wearing.  

I bought an inexpensive cake stand from Save on Crafts http://www.save-on-crafts.com/cakestand.html

With some tulle from Hobby Lobby, I made individual sections in each color.  Once they were tied off with fishing line, I hot glued them to the cake plate.  Hot glue did an amazing job of holding the tulle in place and then once the party was over, the tulle popped right off so we can use the cake stand again.  

For the cake topper, I took two wooden skewers, some fishing line and some felt triangles.  Done and done.  Super easy and beautiful!  
Lollipops from Oriental trading and party circles from Chickabug
Water bottle labels from Chickabug
 Custom banner from Chickabug
 Individual veggie dips for the kids
Even the silverware has to be rainbow themed!  
Birthday wreaths for the front doors
 Fruit served in Waffle Cones
Our Menu
Margaritas and Mason Jars with Straws from The Sugar Diva and Flags from Chickabug
Rainbow Izze Pops
Individual Taco Dips